
Tuesday, May 29, 2007
Next FAL weekend is 1-3 June
Just a reminder to get those items out of the finishing pile ready for our Finish-A-Long happening this weekend. Can't wait to see what everyone comes up with! :D
Monday, May 21, 2007

Sunday, May 20, 2007
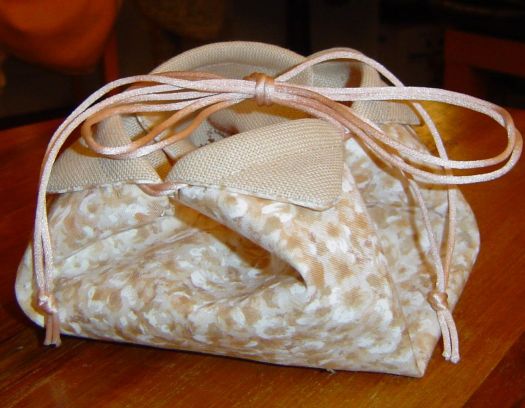
Gallery - My First Bourse
Thank you Isabelle! Although it turned out to be 'easy' to make - I wouldn't have been able to make it at all if hadn't been for your great instructions which made the process so clear. So if any of you out there are thinking 'I couldn't do that' go ahead and have a go, they are so cute! Photos should be clickable (I think!)


I can see lots of bourse making in my future :) Hope you are having a great weekend?
Posted by "Redwitch379"


I can see lots of bourse making in my future :) Hope you are having a great weekend?
Posted by "Redwitch379"
Saturday, May 19, 2007
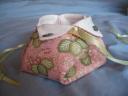
Gallery - Finished Bourse
Thanks to Isabelle, that has shared the bourse tutorial, I made that one this morning. I'm really happy with the result, it will go to my best friend who will have her birthday soon.


Happy stitching and sewing!
Posted by "giusypatch"


Happy stitching and sewing!
Posted by "giusypatch"
Friday, May 18, 2007
Bourse Class
Hi everyone! It's time for our bourse class weekend :)
All the pictures are clickable and shall lead you to a larger view.
You can see the list of materials needed here. The most important thing is having:
1. I'm going to start with a little tip I came up with to make sure you sew a perfectly, perfectly straight line all around the design. The tip was inspired to me by a technique in garment sewing (namely, pulling a thread near the edge of a fabric to determine the grain). We are going to pull a thread from the linen on each side of the stitched piece, right where the seam shall be.
For the first side, you'll just have to determine the seam allowance. It's your call - I like 1cm (3/8") for those small projects :) Once you have decided this, pick up the thread in the linen right on the line where you want the seam to be. I pick it up with a seam ripper, but small pointed scissor will work, too. Do be careful to pick up just this thread. Cut it and pull it out of the linen. You will end up with a small groove, which shall be your seamline :)
For the other sides, you'll first have to go back to the first side and to count the number of linen threads between the stitched design and the thread you just pulled out. Then, count the same number of threads on each side, and pull a linen thread on each side.
You will end up with this:
Go around the whole square, and stop 2-3 inches before the beginning of the seam. This will be the opening through which you'll turn the bourse inside out. (Do not start sewing in a corner. It will be much more of a pain to slipstitch a corner than a straight line, when you close the opening!)
3. Trim the seams close to the seamline (I do it with pinking shears so that the fabric and linen won't fray) and clip the corners. This will ensure crisp edges and corners when you turn the work inside out.
4. Turn your work inside out. Press it carefully (press, do not iron. Pressing ensures you do not distort the seamline and fabric).
Slipstitch the opening closed. (Slipstitching is explained and illustrated in the middle of this page.)
Sew the corners down, stitching a line parallel to the folded edge. This creates the casing. Make sure your casing is wide enough to accommodate two widths of your ribbon/cording/narrow lace.
6. Insert ribbon into the casings. (I use a large knitter's sewing needle, but anything goes).
Once the first length of ribbon/cording is threaded through the casings, make a knot to close it. To determine the length, just make sure it lies flat around the (still open) bourse.
Starting from the other side, thread the second length of ribbon/cording through the casings.
All you need to do now is to pull the ribbons in order to gather up the edges and close the bourse.
Optional: You may sew a button to each corner of the bourse, if desired.
In my case I only sewed one button on to show you, but removed it afterwards. This particular bourse is small, and I felt the buttons would overload it.
Tutor = Isabelle
All the pictures are clickable and shall lead you to a larger view.
You can see the list of materials needed here. The most important thing is having:
- a square design, with plenty of margin around
- an outer fabric of the same size (you can take any kind you want - cotton, silk, satin, brocade, whatever)
- some ribbon or cording to gather and tie the bourse (I chose narrow lace).

1. I'm going to start with a little tip I came up with to make sure you sew a perfectly, perfectly straight line all around the design. The tip was inspired to me by a technique in garment sewing (namely, pulling a thread near the edge of a fabric to determine the grain). We are going to pull a thread from the linen on each side of the stitched piece, right where the seam shall be.
For the first side, you'll just have to determine the seam allowance. It's your call - I like 1cm (3/8") for those small projects :) Once you have decided this, pick up the thread in the linen right on the line where you want the seam to be. I pick it up with a seam ripper, but small pointed scissor will work, too. Do be careful to pick up just this thread. Cut it and pull it out of the linen. You will end up with a small groove, which shall be your seamline :)

For the other sides, you'll first have to go back to the first side and to count the number of linen threads between the stitched design and the thread you just pulled out. Then, count the same number of threads on each side, and pull a linen thread on each side.
You will end up with this:

(Oops! The linen started fraying - but not enough to get me worried. Just handle it carefully - we'll be trimming it in no time anyway ;) )
Now we can really start sewing :)
2. Assemble the outer fabric and the stitched piece.
Pin them right sides together, with the stitched piece on top (since the groove we created in the linen will serve as a guideline)

Start sewing, starting not quite in the middle of a side. Whether you will be sewing by hand or by machine, all you have to do is sew right in the groove created by the pulled threads. Easy, non? :)

Go around the whole square, and stop 2-3 inches before the beginning of the seam. This will be the opening through which you'll turn the bourse inside out. (Do not start sewing in a corner. It will be much more of a pain to slipstitch a corner than a straight line, when you close the opening!)
3. Trim the seams close to the seamline (I do it with pinking shears so that the fabric and linen won't fray) and clip the corners. This will ensure crisp edges and corners when you turn the work inside out.

4. Turn your work inside out. Press it carefully (press, do not iron. Pressing ensures you do not distort the seamline and fabric).
Slipstitch the opening closed. (Slipstitching is explained and illustrated in the middle of this page.)

5. Creating the casings:
Fold the corners to the outside fabric to form isosceles triangles


Sew the corners down, stitching a line parallel to the folded edge. This creates the casing. Make sure your casing is wide enough to accommodate two widths of your ribbon/cording/narrow lace.

The stitching line is barely visible, which is a good thing :)

6. Insert ribbon into the casings. (I use a large knitter's sewing needle, but anything goes).
Once the first length of ribbon/cording is threaded through the casings, make a knot to close it. To determine the length, just make sure it lies flat around the (still open) bourse.

Starting from the other side, thread the second length of ribbon/cording through the casings.

All you need to do now is to pull the ribbons in order to gather up the edges and close the bourse.


Optional: You may sew a button to each corner of the bourse, if desired.

In my case I only sewed one button on to show you, but removed it afterwards. This particular bourse is small, and I felt the buttons would overload it.
Et voilà !
Now you have a cute little bourse, to give or to keep :)
I hope this was clear. If not, please feel free to ask any question by posting in the comments. Again, there is never anything such as a dumb question. Ask me how I know - I'm a teacher! ;)
Also, if you make a bourse, please post a picture to the blog for everyone to enjoy :)
Have fun everyone! Happy bourse-ing ;)
Tutor = Isabelle
Friday, May 11, 2007
Bourse class - materials list
Hi everyone!
We shall be having a bourse class weekend on May 19-20.
Here's a list of what you'll need to make a bourse:
Materials:
Tools:
This is a very easy project, and while a sewing machine will make your work go quicker, you can absolutely do this by hand. Your work will even be more accurate if you sew it by hand - and it won't take that long, I promise. :)
Anyone can do this project - it is ridiculously easy!
Please feel free to ask if you have any question. We all know there is no such thing as a dumb question ;)
Isabelle
We shall be having a bourse class weekend on May 19-20.
Here's a list of what you'll need to make a bourse:
Materials:
- stitched piece: you need a square design to make a bourse, and you'll (obviously) need to cut the linen into a square, leaving a generous margin around the design. My design was 9.2 cm square (3" 3/4) and I added a 5-cm (2") margin, PLUS a seam allowance. For a larger design, you will probably want a larger margin. To determine the width of your margin, just keep this in mind: the stitched piece shall form the bottom of the bourse, and the margins form the sides of the bourse. Do not forget to add seam allowances! (I use 1-cm allowances for small projects)
- fabric square of the same size - I tend to cut mine slightly larger: better be safe than sorry, right? ;)
- ribbon, narrow lace or cording (length will depend on your bourses's size)
- (optional) four buttons
- sewing thread that matches the linen
Tools:
- ruler or measurer's tape
- scissors
- (optional) pinking shears
- pins
- seam ripper or small pointed scissors
- chopstick or whatnot to turn your work inside out and make crisp corners
- hand-sewing needle
(only the essentials are featured in the picture)
This is a very easy project, and while a sewing machine will make your work go quicker, you can absolutely do this by hand. Your work will even be more accurate if you sew it by hand - and it won't take that long, I promise. :)
Anyone can do this project - it is ridiculously easy!
Please feel free to ask if you have any question. We all know there is no such thing as a dumb question ;)
Isabelle
Sunday, May 6, 2007
FAL - Barbara J

Lucialoo's FAL weekend
I finally finished my stitcher's case ! I don't know why, but today was absolutely disastrous ! I sew and unpicked this quite simple case at least 7 to 10 times ! I was screaming against my future DH, my cat und this bloody sewing machine ! But most of all I was really fed up with the french book where I took the design, because their explanations were so poor !
But let's stop complaining and start admiring lol !!! It will be a gift, but I won't tell you the name of the recipient ;-)


Posted by Lucialoo
But let's stop complaining and start admiring lol !!! It will be a gift, but I won't tell you the name of the recipient ;-)


Posted by Lucialoo
Saturday, May 5, 2007
May FAL weekend - KarenV
I decided to try out my version of Pine Mountain Designs' All-Tied Up Pillows on this little piece that I stitched last year. It was quite quick to do, once I'd figured out the measurements and how it all fitted together:
Posted by KarenV
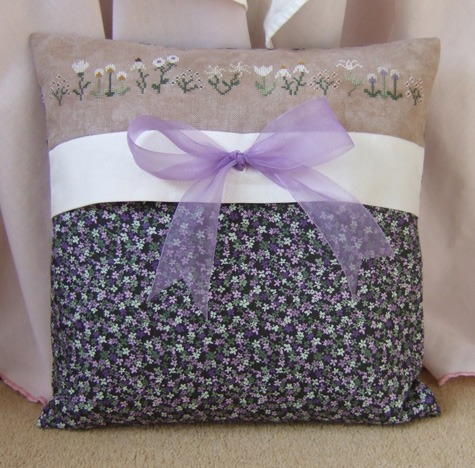
BC Flowers in the Springtime (adapted)
Posted by KarenV
Thursday, May 3, 2007
Next FAL weekend 4-6 May
Yes, it's that time already - this weekend is our monthly FAL weekend. It seems just yesterday that we were working on last month's pieces!
I'm working all weekend, but I still hope to finish my 'And Many More' needlecase by Just Nan ... or be very close to finishing anyway :)
A heads-up about a future event as well ... during the July FAL weekend (6-8 July) we're also joining forces with the Christmas SAL blog, and going to have an 'ornamentifying weekend' - it's a great opportunity to get some of those Christmas ornies out of the finishing pile and into a finished state ready to hang on the tree (I certainly have a pile building up of those!). I hope you'll join us for the fun - and perhaps get some inspiration from finishing techniques that people use :D Thanks Nicki for suggesting this great idea!
Subscribe to:
Comments (Atom)


