Monday, September 23, 2013

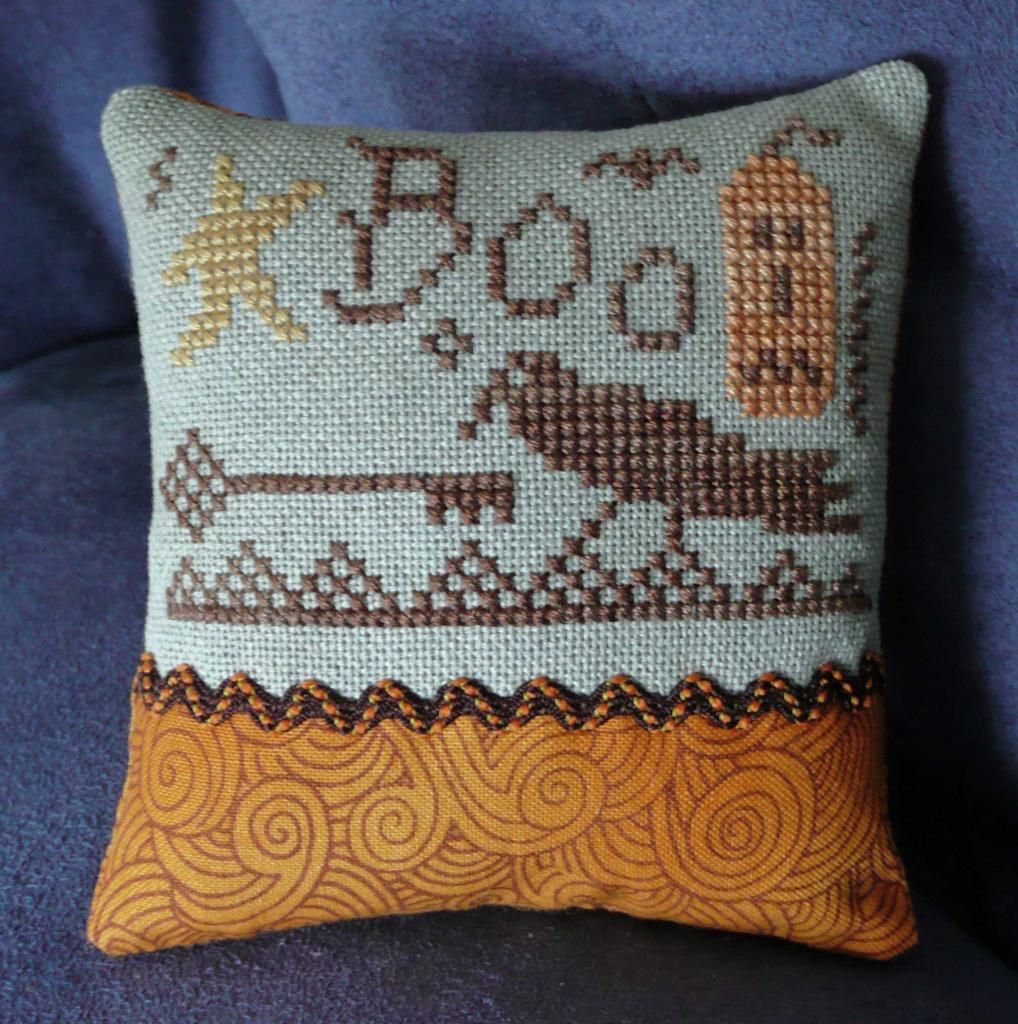
Scissor Fob Tutorial #1

Just a small reminder that any new posts will now be made over at my Wordpress blog.

Yesterday a new Scissor Fob Tutorial was added to the blog, with some more fob tutorials on the way shortly.  I hope you will decide to pop by to see the revamped site and new tutorials.

Kindest regards,

Wednesday, September 18, 2013

Moving back to Wordpress again!

Apologies for being away for so long - family and work commitments have taken me away from my spare time since before Christmas, including a very ill father being in hospital for a few months and me spending time in NZ as support to my parents.  For those of you who follow my personal blog or follow me on Facebook, this is old news that still continues to this day.

I have today started to add the missing photos that went AWOL after Webshots closed its doors, however I have finally decided that Blogger is seriously driving me crazy with trying to add photos, and in a fit of pique I have made the decision to return once again to my old platform of Wordpress for any future posts.

If you wish to see any new tutorials and updates you will need to update your bookmark to the new (old) location, as all new tutorials and updates will be posted to my Wordpress blog instead of this one.  The URL is as follows:

http://focusonfinishing.wordpress.com/

You will see the site has has a small facelift, and all the missing photos have now been reinstated.  Sadly I will miss the choices of personalising the blog template, but the functionality itself is much more suited to me.

I hope you will join me in my new (old) home, and I look forward to bringing some new tutorials to you in the upcoming months.

Kind regards,

Thursday, December 6, 2012

Apologies for the missing photos!

Really sorry that there are "Temporarily Unavailable" pictures everywhere on the blog ... I forgot all my photos on here were hosted on Webshots which has just shut it's doors ... and I need to find the time to upload everything somewhere else and re-add them into the posts once again.

Unfortunately I'm also working 12-14 hour days every day at the moment, so I don't have the energy at night to fix the pages up just yet.  I apologise for any inconvenience, but I'll return to fix the blog as soon as I get some spare time, but that may be a couple of weeks away yet.

Saturday, June 30, 2012

More tutorial links added today:


Monday, June 25, 2012

New tutorial links added


Sorry I've been "missing in action" for some considerable time.  Simply a case of some personal issues at home (and ongoing ill health), and moving to a new job that has eaten up most of my spare time.  I am hoping to rectify the situation soon and have been working on some new tutorials which I will finish soon and publish.  If you have any specific tutorials you'd like to see, don't hesitate to leave a comment and I'll do what I can to arrange something :)

Since my last post I have also become aware of some "new-to-me" tutorials, which I will be adding to the Tutorial Links page.  The new ones are as follows:

Sunday, December 5, 2010

Pin Pillow Tutorial #2

Here is the 2nd pillow tutorial resulting from my finishing spree last weekend:

Pin Pillow 2

You will need:
  • Stitching for the centre of the cushion
  • Coordinating fabric(s) for side strips and backing
  • Sewing machine with coordinating sewing machine thread to match your fabric(s)
  • Scissors/rotary cutter and mat
  • Pins
  • Embellishments (optional)
  • Polyfil stuffing (or something similar)
  • Sewing needle and thread to close up the seam opening

1.1

1. First of all cut your coordinating fabric into equal width strips, and approximate width of your sewing project. In my case I have chosen to have two different fabrics on the front of my pillow, and have started with a narrow strip of bright rust fabric for the inner border.

Pin the first strip with right sides facing to your stitching (I prefer to start with the pieces attached to the left and right sides, but you may prefer to start with the top and bottom sections first), and stitch a normal seam allowance (alternatively you may prefer to just a quilters 1/4" seam).

1.2

Once you have stitched the first seam, attach the 2nd strip of fabric to the opposite side of your stitching and stitch another seam.

1.3

2. At this point I cut off my excess fabrics on each side, and trim my seams to 1/4" - I usually prefer to do this because I don't trust myself to get things right the first time!

1.4

3. You finish with nice tidy edges, ready to attach the last two sides of fabric.

1.5

4. Before we do that, though, we need to open the fabric sides up and give them a quick press with the iron so that they sit nicely. If you want to you can also do a row of top-stitching to assist with holding the fabric nicely, but I don't normally bother.

1.6

1.7

5. Now we attach the top and bottom sides in exactly the same way as we did with the first two sides. Once all sides have finished, I normally check the side strips to ensure they're nice and tidy and even, and if not I give them a quick trim all round with the rotary cutter.

1.8

6. In my case I decided to just have a narrow strip of bright rust fabric as a contrasting focal point, then added some wider strips of fabric for the outside edges. These are attached in exactly the same way as the rust strips, they are just cut into wider pieces. You just need to remember to add the next lot of strips in the same order as you did previously, which was in my case left and right first, followed by top and bottom. Once I had ironed my finished strips I decided that little buttons would be nice in the corners, so I added these before adding the backing fabric.

1.9

7. Now you need to cut your backing fabric the same size as your finished article, and pin them together with right sides facing together (the right side of the stitching will be on the inside of the sandwich).

1.10

8. Stitch a seam allowance around the edges, but leave an opening at the bottom so that you can turn your pillow inside-out. I tend to leave about 1 1/2" opening and that's normally enough room to allow for turning.

1.11

9. I use a chopstick to help push the corners into a nice shape from the outside - you just have to be careful not to force the seam stitching too much! Once you have turned your pillow inside out, it should look something like this. Now all you have to do is stuff it to your preferred thickness with your favourite stuffing.

1.12

10. I close my pillow openings with a ladder stitch - and the following is taken from a previous Christmas ornament tutorial, but is the exact same instruction for closing the pillows.

You need to thread your sewing needle with sewing thread (if you didn't leave a long tail from the seam stitching). You should use a sharp needle here, not a tapestry needle, so that you can pierce the backing fabric easily.

I use a ladder stitch to sew up the opening. As you can see from the left-hand photo below, I start off by slipping my needle into the seam of the backing fabric, then coming back out about 1/4" along the seam (about 3mm) and bring my needle out.

Photobucket

I then take my needle directly opposite where I just came out of the backing fabric and slip my needle into the linen and follow the seam along for about 1/4" (3mm) and bring the needle back out again.

Photobucket

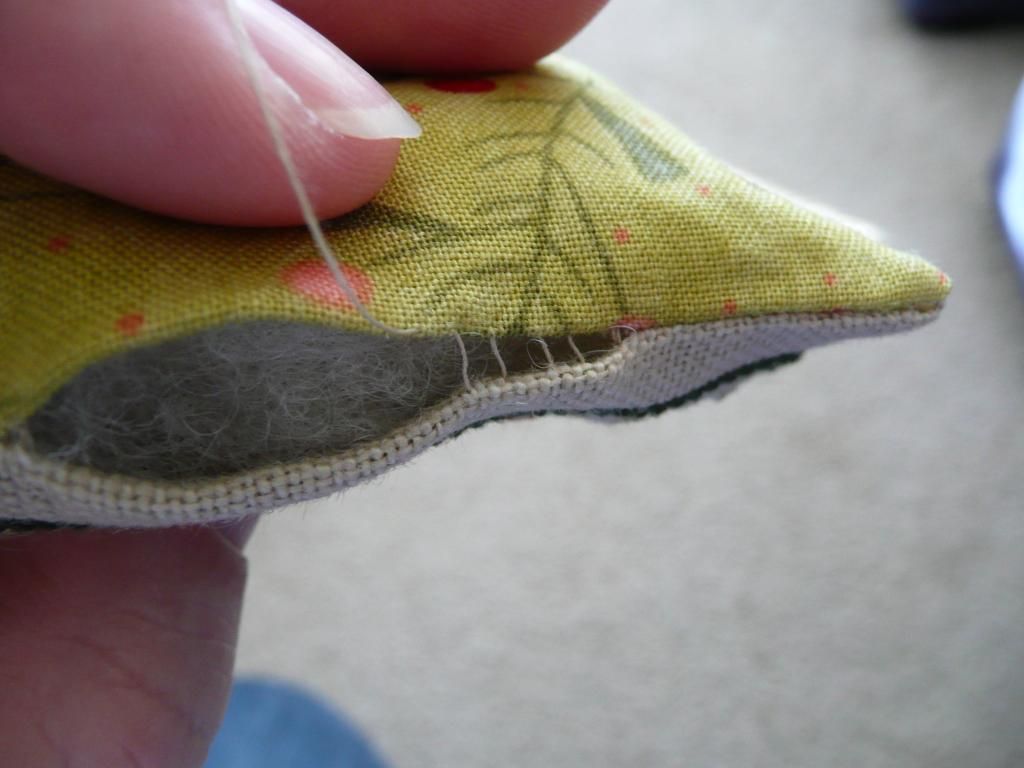
I've left the stitches nice and loose in the photo below to help illustrate how the stitches follow along opposite each other, like rungs of a ladder.
Photobucket

When you pull the thread tighter, the stitches almost disappear into the fabric, giving a really nice clean finish - this is definitely my favourite stitch for closing up openings for that reason!

Once you reach the end of the seam opening, you need to finish off your thread with a couple of teeny stitches - I then bury the needle into the seam and come out somewhere about an inch way and bring the needle back out again - then clip the thread close to the fabric so that my thread tail does't appear easily.

And here's the final seam all finished off - see now nice and tidy that ladder stitch is in the opening? :D

Photobucket

11. And that is the final step in your beautiful new pin pillow coming to life. Now all you need to do is to find somewhere to display it where it can be admired by everyone :D

Pin Pillow 2


I hope you've enjoyed this tutorial, and found it useful. I would love to see any photos of ornaments you've completed using this tutorial so please do drop me a line or leave a comment with a link to your pictures :)


Pin Pillow Tutorial #1

Here is a pin pillow tutorial that I put together during a day of finishing last weekend - I finally managed to sit down and put the instructions together today.

Photobucket

You will need:
  • Stitching for the centre of the cushion
  • Coordinating fabric(s) for side strips and backing
  • Sewing machine with coordinating sewing machine thread to match your fabric(s)
  • Scissors/rotary cutter and mat
  • Pins
  • Ribbon/lace/button embellishments (optional)
  • Polyfil stuffing (or something similar)
  • Sewing needle and thread to close up the seam opening
Photobucket

1. First of all trim your stitched piece, and cut your coordinating fabric to your preferred length and the approximate width of your sewing project. In my case I have chosen to have my coordinating fabric at the bottom of my stitched piece, and I prefer to have the quilting fabric slightly smaller than my stitched piece so it doesn't take too much attention from the stitching - I have, however, seen some stunning pillows with the stitching taking up just a small amount of room at the top of the pillow. The only difference is down to your preference, as the finishing process is exactly the same.

Photobucket

Photobucket

2. Pin the fabrics together, with right sides facing, and stitch a normal seam allowance (alternatively you may prefer to just a quilters 1/4" seam).

Photobucket

3. At this point I cut off my excess fabrics on each side, and trim my seams to 1/4". This is also the time when you should open up the seam(s) and give a quick pressing with the iron.

Photobucket

4. If you have decided to have fabric on both sides of your stitching (either top and bottom, or left and right) this you will need to repeat the above process a second time for the additional piece of fabric. Once you've finished attaching the coordinating fabrics, check the edges to ensure they're all even, and give it a quick trim with the rotary cutter if needed.

5. At this point I add any seam embellishments to the pillow front. For this particular pillow I just wanted to add one row of matching ric-a-rac. This can either be attached by the sewing machine or by hand (I ended up adding this one by hand, as I didn't have a matching brown sewing machine thread). This is also a good time to add any buttons or other trims you want to add, prior to constructing the pillow itself. Alternatively, you can add your ribbon at the very end once the pillow is finished, but just wrapping it around the pillow and tying a bow to hold it in place :)

Photobucket

6. Now you need to cut your backing fabric the same size as your finished article, and pin them together with right sides facing together (the right side of the stitching will be on the inside of the sandwich).

Photobucket

7. Stitch a seam allowance around the edges, but leave an opening at the bottom so that you can turn your pillow inside-out. I tend to leave about 1 1/2" opening and that's normally enough room to allow for turning.

Photobucket

8. I use a chopstick to help push the corners into a nice shape from the outside - you just have to be careful not to force the seam stitching too much! Once you have turned your pillow inside out, it should look something like this. Now all you have to do is stuff it to your preferred thickness with your favourite stuffing.

Photobucket

9. I close my pillow openings with a ladder stitch - and the following is taken from a previous Christmas ornament tutorial, but is the exact same instruction for closing the pillows.

You need to thread your sewing needle with sewing thread (if you didn't leave a long tail from the seam stitching). You should use a sharp needle here, not a tapestry needle, so that you can pierce the backing fabric easily.

I use a ladder stitch to sew up the opening. As you can see from the left-hand photo below, I start off by slipping my needle into the seam of the backing fabric, then coming back out about 1/4" along the seam (about 3mm) and bring my needle out.

Photobucket

I then take my needle directly opposite where I just came out of the backing fabric and slip my needle into the linen and follow the seam along for about 1/4" (3mm) and bring the needle back out again.

Photobucket

I've left the stitches nice and loose in the photo below to help illustrate how the stitches follow along opposite each other, like rungs of a ladder.

Photobucket

When you pull the thread tighter, the stitches almost disappear into the fabric, giving a really nice clean finish - this is definitely my favourite stitch for closing up openings for that reason!

Photobucket

Once you reach the end of the seam opening, you need to finish off your thread with a couple of teeny stitches - I then bury the needle into the seam and come out somewhere about an inch way and bring the needle back out again - then clip the thread close to the fabric so that my thread tail does't appear easily.

And here's the final seam all finished off - see now nice and tidy that ladder stitch is in the opening? :D

Photobucket

10. And that is the final step in your beautiful new pin pillow coming to life. Now all you need to do is to find somewhere to display it where it can be admired by everyone :D

Photobucket

Following are some additional pillows I have finished in the same way - isn't it amazing how such a simple finishing method can look so different depending on the choice of fabrics and embellishments?

Photobucket Photobucket Photobucket Photobucket Photobucket Photobucket


Made by Lena