Showing posts with label Scissor Fobs. Show all posts

Sunday, September 21, 2008

Gallery - Seen on the Blogs

I have tried to keep a note over the last 12 months when I saw mention of a finish made using one of our Focus on Finishing tutorials - I have since been in contact with the stitchers on my list, and have heard that it's OK to post piccies of their finishes on the blog ... so, here's a bit of eye candy that I hope you will enjoy (hopefully there will be another post over the next week once I hear back from a few more people) :)

Flanged Pillow Tutorial


Finished by Jenna
(full blog post is found here)

Stitcher's Bourse Tutorial


Finished by Terri for Melissa
(full blog post is found here)


Finished by Jeannie-Marie
(full blog post is found here)

Beaded Scissor Fob Tutorial


Finished by Dawn B
(full blog post is found here)

Needleroll Tutorial


Finished by Kim B
(full blog post is found here)

It's particularly good for the tutors to see that their classes are being used - and don't forget, if you have some finishes to share we'd LOVE to see them here too! All you have to do is to drop me an email with your Blogger details, and I can add you as an author :D

Sunday, July 13, 2008

Strawberry Fob Finishing Class

Summer Quaker Strawberry for Amy in SC

Hello all,

I'm running a bit late this month but have finally cobbled together some photos and text for Strawberry fob finishing.

First gather your equipment...

first gather your equipment

For this project you will need:

  • Stitched project - some suggestions: Prairie Schooler chart 100 - American Strawberries & chart 101- Prairie Strawberries (used for this tutorial), Anita's little Stitches designs, Blackbird Designs - there is a strawberry fob in the Secret Garden pattern (OOP) from the Loose Feathers series of 2006 and a Blackbird Designs also designed a fabulous quaker strawberry for the 2006 Annual Just Cross Stitch Christmas Ornaments issue (I'm sure this one is still available).

  • Interfacing

  • Ribbon, felt

  • Stuffing

  • Scissors, needle, thread, pins.

  • Iron

And you can see in this photo, I also made sure I had a cup of tea to work with.
Iron on the interfacing on the reverse side of your stitching
Take your stitched piece and iron a piece of interfacing to the reverse of the stitching.
pin the template on and cut around
Make a semi-circle template, pin to the stitching and cut around. You can see I have mucked up centering this up with the "quiltish" strawberry above - this is not really a problem for this finishing technique.
fold and finger press the straight seam
Next, finger-press a small seam along the straight edge. Make this seam as close to the stitching as possible.
use a ladder stitch to join the straight seams
Fold the semi-circle to form a cone (see above). Stitch the straight seams together. I like to use a ladder stitch to do this, but you can use a sewing machine if you wish (I find it is easier to do this by hand).
you might be able to make out the ladder stitch from this photo
I kinda hoped you'd be able to see the ladder stitch in this photo. If you pull it nice and tight it disappears into the seam. I'm pretty pleased with the join for this strawberry.
run a gathering stitch around the edge of the cone shape
If you used the ladder stitch to join the seam, secure the thread and then run a gathering stitch around the top of the cone around 1/2 an inch from the top.
add stuffing and pull the running stitch gather.
Draw the gathers together a little and stuff your strawberry - I've used hobbyfill.
gathering the top of the strawberry
Draw the gathers tighter and run a few stitches across the "opening" and pull these tight to secure your thread. You can insert a hanger at this point if you wish, stitch through it as you secure your thread.
Top of the strawberry with felt cap in place, tacked down.
For my first strawberry, I've attached a felt cap. I cut the felt out using the template in the pattern (Prairie Schooler pattern 101: Prairie Strawberries) and tacked it to the strawberry.
sewind down the felt cap
Next, I stitched around the felt using a buttonhole stitch - making sure I caught the linen beneath. Then I attached the second felt star (template from the prairie schooler pattern) using buttonhole stitch.
felt wool cap all complete
Attach a hanger to the top. I made a loop of ribbon and secured with tiny tacking stitches and slipped a bead over the ribbon to hide the stitches.

Another pretty way to finish the strawberry is to tie ribbons around the hanger - I learned this technique from Janie Hubble from The Cat's Whiskers Design Studio at a class last year.

attaching hanger and first ribbon bow for a ribbon capped strawberry
Here's the other design I stitched from Prairie Strawberries by Prairie Schooler. You can see in the photo I have gathered the top and inserted the hanger. I've cut a length of ribbon and tied it in a bow around the hanger. Just keep tying bows around the hanger - pushing them down towards the strawberry. Have them facing in different directions.
ribbon cap all done
When you are satisfied with the ribbons, trim the ends and you are done.
The completed strawberries out in my little garden
Here are the two finished strawberries. I love them! - So cute!
I hope you will enjoy making your own strawberries too and will find this tutorial useful.
Cathy.

Tutor = CathyMK

Friday, February 15, 2008

Beaded Scissor Fob - Class

Welcome to the beaded scissor fob tutorial! I am posting this a bit early, because I know that there are many readers who are in much earlier time zones, and I want to make sure that these instructions are available for the weekend. These fobs are so pretty...and so quick and fun to make. I hope that you find this to be an enjoyable project.

I am right-handed, so I am writing the instructions from that perspective.

Cut a length of beading thread. You will be doubling up the thread, and will want it long enough to be able to run it through the length of your fob several times, especially if you are using heavy beads. Now is not the time to be stingy with thread :)

Fold your beading thread in half, and thread the two loose ends through the needle. You will have a loop at the other end.

Pick up the lobster claw clasp and pass the threaded needle through the loop in the clasp. Now pass the needle through the looped end of the beading thread, and pull tight. This knot is called a lark's head knot, and a good picture of it can be found here.

Now, you need to make a couple more knots to make sure your beading thread is secure. Don't worry...it's not hard. Relax and take a couple of deep breaths :)

Refer to the series of pictures below for clarification of the procedure.

Hold the lobster claw clasp in your left hand. I hold it between my thumb and ring / pinky finger. Create a loop by loosely wrapping the thread around your index finger on your left hand. Pass the needle through the loop in the lobster claw clasp, and then through the loop in the thread. Pull tight. Repeat this a couple more times.

Knotting procedure pictures:

fob8.jpg

fob9.jpg

fob10.jpg

You will be repeating the steps above a bit later on. The good news is that this is as complicated as it gets!

Thread your selected beads and spacers onto the beading thread until you are happy with the length and appearance. There aren't any rules here! If you don't like what you have done, it is easy enough to change the arrangement. I usually like to keep the beaded portion of my fobs around 4 inches, especially if I am using large glass beads. If you are using more delicate beads, you could make it longer. I also like to use the spacers at the beginning and end of the fob, and between the beads as accents. When you are happy with your design, carefully set your fob aside while you do the next step.

fob4.jpg

Thread the jump ring onto the charm. This is always the hardest part for me...and especially so if you have long fingernails :)

fob5.jpg

Carefully pick your fob back up and thread on the charm.

If you are using lightweight beads, you could knot the charm on at this point, following the same knotting procedure shown in the pictures above. You also would probably not need to run the thread back and forth through the fob several times as I describe below. I have found that the knotting the charm on and maintaining the proper slack is very difficult to do at this point if you are using heavier glass beads like I have chosen. I also feel safer about the durability of the fob if I run the thread through the length of it several times. You can decide if it is necessary or not, depending upon the materials that you have selected. If you choose to skip all of this, feel free to jump on down to the ending off portion of the instructions :)

fob6.jpg

Run the needle and thread all of the way back through your beads until you get back to the lobster claw clasp. It works best to run your needle through a couple of beads at a time while you are doing this. Once you are back up to the lobster claw clasp, make sure that you have the desired amount of slack between all of the beads and charm. You don't want it to be too tight, since it won't be flexible. Too loose isn't good, either. I have found that it is easier to achieve the appropriate slack if you do this rather than trying to knot the charm on directly.

Make another knot or two on the lobster claw clasp end, using the same process that you used in the beginning (refer back to the series of knotting procedure pictures above).

Now you are going to run the beading thread back to the charm end, using the same process that you used to get to the lobster claw clasp end. When you reach the charm, make a couple of knots to secure the charm. Again, you will use the same process shown in the series of hand pictures above).

If you have chosen to jump ahead, here is where you will pick up the instructions again...

Run the beading thread partially back up the the length of the fob. Make a couple more knots to secure, and then run the thread back up a couple of beads or so before cutting it off.

If desired, you can reinforce your knots on the lobster claw clasp end and charm end with a dab of clear nail polish.

That's it! Stand back and admire your beautiful creation. I'm sure that you will now want to make several more of these :)

If you have any questions or need clarification on anything, please do not hesitate to leave a comment or send me an e-mail.

fob7.jpg


Tutor = Cindy

Sunday, February 10, 2008

Beaded Scissor Fob - Class - Materials List

The beaded scissor fob class will be held on the weekend of February 16-17. These are so pretty...and so quick and fun to make.

Here are some examples of fobs that I have made in the past:

fobexamples.jpg

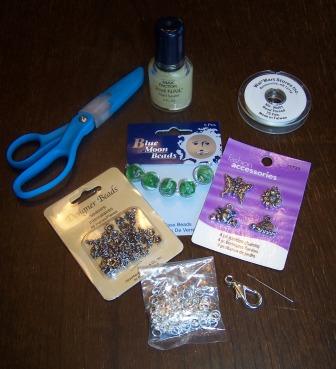
Supplies that you will need:
  • Beading thread
  • Pretty beads (the ones that come strung on cards often have smaller coordinating beads along with the larger ones.)
  • Spacers (the metal decorative beads shown above...you don't need to use these, but they are a nice touch and good to at least use at the top and bottom of the fob.)
  • Charm
  • Jump ring
  • Lobster claw clasp (large enough to hook onto a pair of scissors)
  • Needle (any size will work, as long as it will pass through the holes in the beads that you have selected)
  • Scissors
  • Clear nail polish (optional)
Edited to add: I have found all of my beads & beading supplies at either Hobby Lobby, Michael's or Walmart. The charms that I used were from Walmart, and the glass beads were from Hobby Lobby. Any of the places mentioned carry spacers, jump rings, and beading thread. I am pretty sure that the large lobster claw clasps were found at Hobby Lobby. They have their stock organized more by brand then category, so you may have to check in a couple of different spots in the beading aisle. The ones that I used measure about 1 inch from end to end, and about 1/2 inch wide.

fob1.jpg

So, gather your supplies and get ready for a fun class! Please let me know if you have any questions about the supply list :)

Tutor = Cindy
 

Made by Lena