I've added Niky in Italy's blog to the Inspiration page. Niky is a prolific stitcher and accomplished finisher, who does wonderful work. I can't find an online album for her, but there are loads of beautiful pictures of her stitching and finishing on her blog.
I've also added 2 tutorials to the tutorials page showing how to add a zipper to a project. I used both of these tutorials when I made my zippered project bag recently and I thought they might be useful to include here.
U-handblog zippered pouch
Twelve22 zippered pouch
Posted by KarenV
Tuesday, July 31, 2007
Gallery - My Bourse


I made this last week using the tutorial on this blog. I have no finishing skills what so ever but this tutorial was so great and easy that even a newbie like me could do it. It's for a friend and it's going to be hard to give it away but I already have other things that I want to "bourse" so I'll have my own soon. Thanks Isabelle for making such a great tutorial!
Posted by "mia61075"
Sunday, July 29, 2007
Gallery - Tie-on pillow finish

Finished an ornament sized tie on pillow and loved the instructions. Used a Homespun Elegance design for the stitched piece. The color of the pillow and ribbon are dark green but because of the background is showing more blue.
Posted by "sweetana3"
Ch-ch-ch-changes!
Anne and I have been putting our heads together (well, as best as we can being several time zones and thousands of miles apart ;) ) and we wanted to share with you what we have planned for the blog over the next few months.
First off, we're changing the idea and format of the FAL weekends, since they haven't taken off that well. From August, there won't be a specified FAL weekend; instead, each month will have a different finishing theme, either a specific finish or a seasonal theme (or both!). Everyone is invited to join in at any point during the month, finish something along the lines of the theme and post their finishes on here. To give you some inspiration, we plan on highlighting relevant tutorials and including links to and photos of stitchers' work to get you started. The themes won't be too rigid so hopefully as many of you as possible will be able to finish something appropriate and join in. Also, every other month starting from December, just to make it a bit more fun, we'll be having a prize draw for anyone who posts a themed finish during that particular month! :)
Secondly, Anne has collated all the results from the polls that we took earlier this year and we're in the process of working out a new schedule of classes for next year. The plan is to run two classes per month, so that you don't have to wait so long for a class that you really want to do, plus it will hopefully create more participation and activity on the blog, which we're also trying to encourage ;) More details will follow very shortly.
On the subject of classes, it's been lovely to see people using the class tutorials that have been offered so far this year and the results have been wonderful! We'd like to encourage anyone who has finished something using one of the class tutorials to post their finish here so that we can all admire them :) I know I've been asking individual people to do this if I see a finish on their blog, but I don't visit every single blog so please feel free to post your finishes here as we love to see what people have done with the classes we've been offering. Also, if you create a tutorial and post it up online somewhere, please add a comment to the tutorials page or email either of us so that we can add it to the list!
Now it's your turn. Is there anything you'd like to see covered in the blog that isn't here already? Any gaps, anything we could do to encourage more participation? All suggestions welcome :)
Posted by KarenV
Friday, July 27, 2007
Gallery - Tie-on pillow

This is Little House Needleworks Where There is Life finished off as a tie-on pillow using KarenV's fantastic tutorial. Thanks Karen:)
Posted by "stitchyangel"
Gallery - Another Tie-on Pillow
Many thanks to Karen for her tie-on pillow class. I used it to make a gift for an exchange and it worked really well. I'll be making more of these!
Posted by Nicki

Posted by Nicki
New page - list of online suppliers
As this blog is all about providing a comprehensive information resource to do with all aspects of finishing, I've set up a page with links to online shops selling finishing supplies. This can be anything to do with finishing, including patchwork fabric, ribbons, pins, finishing tools and gadgets, bellpull hardware, etc. etc.
The list that I've started is obviously not exhaustive, it's just that - a starting point. We would obviously like you to post your favourite online shops as well so that we can have as complete a list as possible, especially for items that are hard to get hold of locally.
If you have a favourite shop that isn't already listed, please leave a comment here or on the online suppliers page with the following information:
Name of shop
Country that shop is based in
Finishing supplies that they sell
Payment method (e.g. PayPal, credit card)
Anything else you want to say about the shop
Please DO NOT post links to your favourite stitching shops unless they sell items that can be used for finishing. This is purely a listing of suppliers that sell items to help us to finish our stitching into a displayable form, rather than a list of stitching shops in general.
Also, please don't include shops unless they have a website and they will ship internationally, as I want this list to be as widely accessible as possible.
Thanks and I hope you find the new page useful!
Wednesday, July 25, 2007
Christmas ornament FAL draw result!
The winner of the FAL goodies after our Christmas ornament FAL weekend is sweetana3! Congratulations Ana!
If you email me (luluminstrel@hotmail.co.uk) with your address I'll get your prize sent out to you as soon as possible.
If you email me (luluminstrel@hotmail.co.uk) with your address I'll get your prize sent out to you as soon as possible.
New tutorial links added
Leena has created a tutorial on her website for a fabulous stitched book.
There are also 2 new flatfold tutorials; one from Vonna and one from Lisa. Thanks ladies! :)
Links have also been added to the tutorials page
There are also 2 new flatfold tutorials; one from Vonna and one from Lisa. Thanks ladies! :)
Links have also been added to the tutorials page
Sunday, July 22, 2007
Flange pillow

I had fun making this pillow. Thank you so much for this excellent tutorial Katrina! :D
Posted by "stitchanne"
Saturday, July 21, 2007
Flange Pillow Tutorial
Hello everyone, this weekend its time for our Flange Pillow class.

For the list of materials see here.
Anyone can do this project, its very easy and feel free to ask any questions if you are unsure of something :)
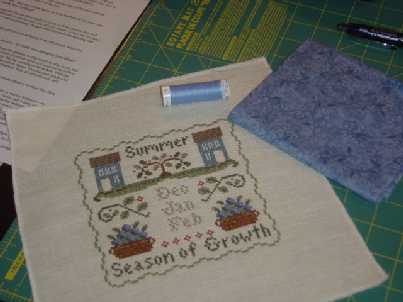
There are two parts to making a flange pillow, firstly, finishing the stitched piece and then making the pillow. Lets begin by getting the stitched piece ready.
(Please note: for my pillow I used 1/4 inch seam allowance)

Press your stitched piece from the back.
Measure out 1 inch from the stitched edge and trim. Cut some light coloured backing fabric (I used calico fabric) to match the same size as the stitched piece.

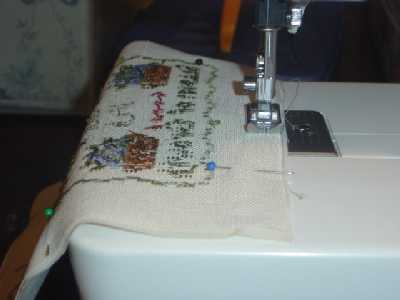
Place atop of stitched piece, right sides together. Sew together using a 1/4 inch seam, leaving a small opening for turning. Trim if you need to and turn right side out.

Press and blind stitch the opening closed.
------------------------------------------------------------
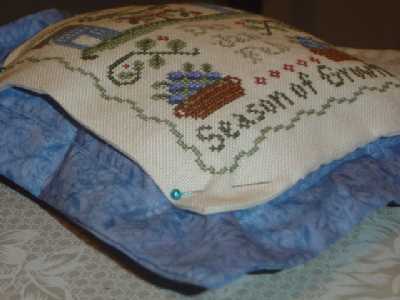
Now for the Pillow: these next instructions are based on finishing a 9 1/2 inch square pillow, with the flange measuring 1 inch.
Cut two 9 3/4 inch squares from your coloured fabric. Now pin the two pieces right side together. Sew all around using 1/4" seam, leaving a small opening for turning.

Turn in right way and press.
Mark 1" from the edge all around the square on wrong side of pillow -this is where you will sew to make the flange. I use a water soluble pen to do this.

Start your sewing parrallel to the outside opening and sew around the square, finishing parrallel to the other end of outside opening.
Now you are ready to fill your pillow with stuffing.

Fill to desired "puffiness" and then you can either handsew the two openings closed or use your sewing machine. I sew the inside opening closed and then use a blind seam on outside edge.

Now its time to join on the stitched piece. Place stitched piece onto pillow and pin into place.

You can use buttons that have been covered in matching fabric, like I did, or other suitable buttons. Sew buttons onto four corners, sewing through the stitched piece to the pillow to secure.
That's all there is to it - admire your pillow!!
I hope these instructions make sense -like I said earlier, please feel free to ask any questions if you have any. I know that some people will use a different sized stitched piece so the measurements will need to be adjusted to allow for that. If you need some help with working out what size your pillow will be, please let me know.
Also, please post a photo to the blog of your finished pillow as everyone would enjoy seeing them.
Have fun and happy sewing,
Katrina
For the list of materials see here.
Anyone can do this project, its very easy and feel free to ask any questions if you are unsure of something :)
There are two parts to making a flange pillow, firstly, finishing the stitched piece and then making the pillow. Lets begin by getting the stitched piece ready.
(Please note: for my pillow I used 1/4 inch seam allowance)
Press your stitched piece from the back.
Measure out 1 inch from the stitched edge and trim. Cut some light coloured backing fabric (I used calico fabric) to match the same size as the stitched piece.
Place atop of stitched piece, right sides together. Sew together using a 1/4 inch seam, leaving a small opening for turning. Trim if you need to and turn right side out.

Press and blind stitch the opening closed.
------------------------------------------------------------
Now for the Pillow: these next instructions are based on finishing a 9 1/2 inch square pillow, with the flange measuring 1 inch.
Cut two 9 3/4 inch squares from your coloured fabric. Now pin the two pieces right side together. Sew all around using 1/4" seam, leaving a small opening for turning.

Turn in right way and press.
Mark 1" from the edge all around the square on wrong side of pillow -this is where you will sew to make the flange. I use a water soluble pen to do this.

Start your sewing parrallel to the outside opening and sew around the square, finishing parrallel to the other end of outside opening.
Now you are ready to fill your pillow with stuffing.

Fill to desired "puffiness" and then you can either handsew the two openings closed or use your sewing machine. I sew the inside opening closed and then use a blind seam on outside edge.

Now its time to join on the stitched piece. Place stitched piece onto pillow and pin into place.
You can use buttons that have been covered in matching fabric, like I did, or other suitable buttons. Sew buttons onto four corners, sewing through the stitched piece to the pillow to secure.
That's all there is to it - admire your pillow!!
I hope these instructions make sense -like I said earlier, please feel free to ask any questions if you have any. I know that some people will use a different sized stitched piece so the measurements will need to be adjusted to allow for that. If you need some help with working out what size your pillow will be, please let me know.
Also, please post a photo to the blog of your finished pillow as everyone would enjoy seeing them.
Have fun and happy sewing,
Katrina
Flanged Pillow Ornament
You can't realy tell where the puffy areas end and the flange begin because of the dark coloured fabric. I cheated a little as I used Katrina's tutorial but appliqued a tatted motif instead :)
Thanks to you Katrina, I am quite confident now with this kind of finish and will definitely try more!

This is going out to a stitcher friend...I don't think she reads this blog...at least I hope not ;)
Posted by Barbara J
Thanks to you Katrina, I am quite confident now with this kind of finish and will definitely try more!
This is going out to a stitcher friend...I don't think she reads this blog...at least I hope not ;)
Posted by Barbara J
Thursday, July 19, 2007
Flange Pillow Tutorial Reminder
Hi everyone, just a reminder that this coming weekend, 21st and 22nd July, its time for our flange pillow tutorial.
For a list of materials, please see here

Hope you can join us :)
bye for now, Katrina
For a list of materials, please see here

Hope you can join us :)
bye for now, Katrina
Monday, July 9, 2007
Gallery - July ornies
Here's two ornies I stitched and finished over the weekend, Holiday Holly by Mill Hill and the Tree Keeper, a freebie from the Drawn Thread.


Posted by Katrina


Posted by Katrina
Sunday, July 8, 2007
Happy finishes


Gallery - My guestbook

Those of you who read my blog know that I will marry the 1st of September...

Here are our initials...

A little heart from Bleu de Chine...

The kit I used...

And finally our guestbook...


Posted by "lucialoo"
More finishes for this weekend


Maybe third time will be the charm. Some more finishes this weekend. Ana
Saturday, July 7, 2007
Mid-year Christmas

For those of us in the Southern Hemisphere fighting the winter chills, it feels quite appropriate to drag those unfinished Christmas ornies and snowmen out of the closet to bring them into a life of their own this weekend!
I hope a few of you will join us and the Christmas Ornie SAL blog and post your ornie finishes here over the weekend. Don't forget there is a prize up for grabs - Karen, Nicki and myself have put a wee parcel of goodies together ... everyone that posts a piccie of a completed ornie (ie finish-finished) on this blog will have their names go into the draw for some Christmassy finishing supplies.
Looking forward to seeing those piccies arrive - if you need help don't hesitate to scream out to Karen or myself (links are in the sidebars) ... or you can leave a comment here, of course. You'll need to have a WordPress account to post to the blog, but you don't need to have an actual WP blog to be a member :)
Rightio, who's got the eggnog?? ... Let the fun begin! :D


Gallery - Starting the ball rolling...
OK, here's my contribution to this special ornament FAL weekend :) I finished up the 4th, 5th and 6th blocks of my PS 12 Days of Christmas wreath - halfway there now!
Posted by KarenV

I'm looking forward to seeing everyone's ornament finishes this month and don't forget - if you post a photo of your finishes on this blog, your name will go into the draw to win some great finishing supplies - bonus! :D
Posted by KarenV
Tuesday, July 3, 2007
Flange Pillow Materials List
Flange pillows are great fun and are used alot by many of our favourite designers. So what is a flange pillow? Its a pillow that has a border of flat fabric that goes around the outer edge of the pillow. This border is not sewn on; it is an effect created by sewing and stuffing the actual pillow a few inches away from the edge of the material.
Later in the month I'm going to be showing a tutorial on how to make one, just like the photo above. To make the pillow just like mine, 9 1/2" square, you will need the following supplies:
1. Your stitched piece. (My stitched piece was 5" by 5" square).
2. Some plain backing fabric (calico fabric is good for this).
3. Sewing thread and fabric to match your design.
4. Stuffing for the cushion.
5. Four buttons.
6. Pins, sewing scissors, a needle, and your sewing machine.
The class is going to be the weekend of the 21st & 22nd July so I hope you can join me then. In the meantime, happy stitching and feel free to leave me any comments if you have any questions.
Tutor = Katrina
Next FAL weekend 6-8 July
Just a reminder to get those items out of the finishing pile ready for our Finish-A-Long happening this weekend.
We're also joining forces with the Christmas SAL blog for an ornamentifying weekend, so we'd love to see all the ornaments that get finished over the weekend as well :D
And, as an extra little incentive, this month everyone who finishes something and posts it to the blog will be entered into a draw to win some lovely finishing stash! So dig out your stitched pieces and your finishing supplies and get ready to join in.
Gallery - My 2 old bourses
These are 2 bourses I made last year and the year before that are done like in Isabelle's tutorial... As Karen said in her previous post, I just share pics with you ;-)


Posted by "lucialoo"


Posted by "lucialoo"
Subscribe to:
Posts (Atom)


